PMAG ENGRAVING
YOUR PERFECT MAG
The engraving process begins with the development and approval of the design. This is a collaborative stage, where clients can bring their own ideas or work with the team to create something from scratch. Artwork can be hand-drawn, traced from reference images, or sourced using platforms like Google or AI design tools. Once the final artwork is prepared, client approval is essential before moving forward to ensure alignment on the final output.
The Engraving Process

Design & Approval
The engraving process begins with the development and approval of the design. This is a collaborative stage, where clients can bring their own ideas or work with the team to create something from scratch. Artwork can be hand-drawn, traced from reference images, or sourced using platforms like Google or AI design tools. Once the final artwork is prepared, client approval is essential before moving forward to ensure alignment on the final output.


Material Preparation
With the design approved, attention shifts to preparing the magazine. For optimal results, it’s recommended to use brand-new PMAGs straight from the packaging. While used magazines can still be engraved, they may yield less consistent outcomes due to wear or surface contamination. Throughout handling, gloves must be worn to prevent oils from transferring to the surface, as these can interfere with the engraving quality.
When selecting between Gen 2 and Gen 3 PMAGs, it’s important to note that Gen 3 magazines tend to produce more vibrant and consistent color results. However, both generations can be used depending on the desired finish. That said, engraving results can occasionally vary due to manufacturing inconsistencies beyond the user’s control.
Steel magazines behave differently under the laser. Rather than producing a range of colors like PMAGs, steel magazines simply reveal the raw metal beneath the coating. Because the engraving exposes bare steel, a protective sealant should always be applied afterward to prevent rust.

Artwork & Laser Setup
Once the magazine is ready, the design is prepared for engraving. This involves importing the artwork into a program such as Adobe Illustrator to convert it into vector format. For complex designs, each element—such as backgrounds or layered images—should be placed on its own layer. Ensuring all paths are expanded and closed correctly is crucial, as the laser will pick up every detail during engraving.
The vectorized artwork is then imported into the laser software and precisely aligned with the surface of the magazine. The laser’s height is adjusted using a focus stick or measurement guide to achieve the correct beam distance. This step is vital for clean, consistent engraving and prevents damage to the magazine material.
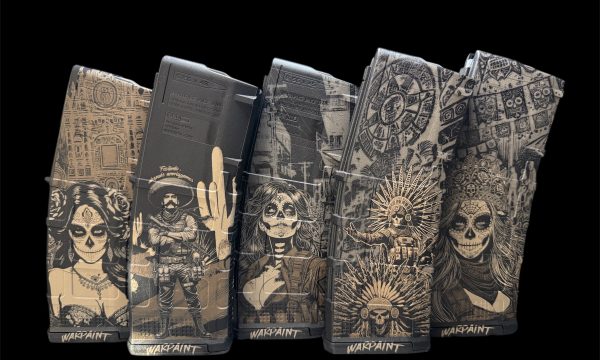
The 210 lens is typically used for PMAG engraving as it concentrates the laser beam effectively without overheating or melting the plastic, provided settings are accurate. Speed, frequency, power, and pulse parameters are adjusted depending on the magazine material and desired outcome. For PMAGs, the correct settings can produce a variety of shades—from white and tan to brown and gray—while for steel magazines, the focus is on engraving depth rather than color.


Engraving & Finishing
With everything set up, the engraving process begins. The magazine is securely positioned to prevent any movement, and the laser is run according to the established settings. On average, each side of a PMAG takes about five minutes to engrave, although time may vary based on design complexity.
After engraving, the finishing steps help bring out the final detail and protect the work. PMAGs benefit from a wipe-down with rubbing alcohol, which removes any residue and enhances the contrast of the engraved colors. For steel magazines, applying a rust-prevention sealant is essential to protect the exposed metal. A final inspection ensures that colors are consistent on PMAGs and that the engraving depth on steel magazines is even and clean. If needed, areas can be re-engraved for touch-ups to achieve the best possible finish.


